Save Filter Sets
Selection Master’s filter pane allows quick viewing, modification, and switching between filter sets directly on the palette!
 Features
Selection Master’s filter pane allows quick viewing, modification, and switching between filter sets directly on the palette!
Selection Master allows you to preview and work with the elements that satisfy the filters in the current filter set
You can use Quick Filters as a shortcut to easily apply the basic filters with predefined settings in a single click.


The Selection Master palette can be used to create filters based on any of these properties or combine as many filters as desired to refine the set.
Find all doors over 7′-0″ high on the second floor, or simply find every element related to the second floor level.
After filtering, elements can be further refined by simple selection in the UI and then shown in the Revit canvas or even exported to csv for analysis in other programs.

While some filter sets are only useful once, most can be useful continually throughout a project life cycle. Selection Master allows you to save filter sets directly into a project (or template) file. With filter sets saved to the file they are accessible to all team members and even those in other offices.
Selection Master’s filter pane allows quick viewing, modification, and switching between filter sets directly on the palette!

Selection Master allows you to preview and work with the elements that satisfy the filters in the current filter set. Once you have the current filter set configured the way you want it simply press the ‘Refresh’ button on the left side of the element preview list and Selection Master will show you the elements that match your filters.
Once this list is populated you can do further work with the elements by:
You can use Quick Filters as a shortcut to easily apply the basic filters with predefined settings in a single click.
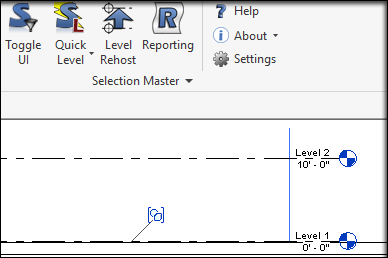
Want to find all elements related to a certain level? Use the ‘Quick Level’ command.
Want to quickly select everything created in Phase 2? Use ‘Quick Phase Created’.
You can even use Quick Level to avoid losing elements when removing redundant or unnecessary levels.
Ever decide that a level is redundant and unnecessary but were afraid to delete it because you knew you would lose everything that may still be on that level? Or just place a series of elements only to find out that you were working on the wrong level? Selection Master to the rescue!
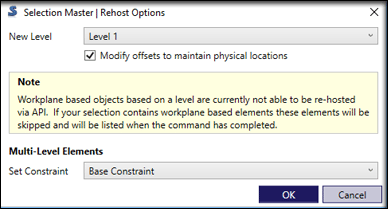
If you need to delete a level, use the Quick Level tool to find everything on the level and rehost to move it; if you just placed some objects on the wrong level simply select them and use rehost to move them to the correct level.
Watch Video
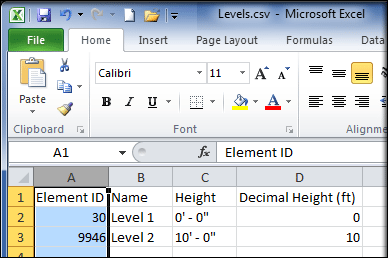
Selection Master not only allows you to preview the elements that match the filters, you can also export the data to a comma separated value (.csv) or plain text (.txt) file for use or analysis in any standard spreadsheet program.
In addition to exporting the preview data, Selection Master also allows exporting of all the levels, grids, families, and phases in the project.
Lastly, Selection Master allows you to view all plan and ceiling plan views in the project and sort or filter them by level and export this data to .csv or .txt.